How to Make a YouTube Banner (Adobe Photoshop Channel Art Tutorial with Free Template)
A YouTube banner is one of the first things people see when clicking on your YouTube Channel. Having professional-looking channel art gives your audience a fast visual view of who you are. If you have tacky/cheap-looking channel art, people will perceive your channel to be tacky/cheap. If your channel art looks professional, they will look at your account more seriously. Whatever theme you want to convey, just like a book cover, you just have a few precious seconds to grab your audience's attention. In this blog post, we will be going over How to Make a YouTube Banner (Adobe Photoshop Channel Art Tutorial with Free Template).
If you do not already have Adobe Photoshop installed on your computer, Click Here to download a free trial.
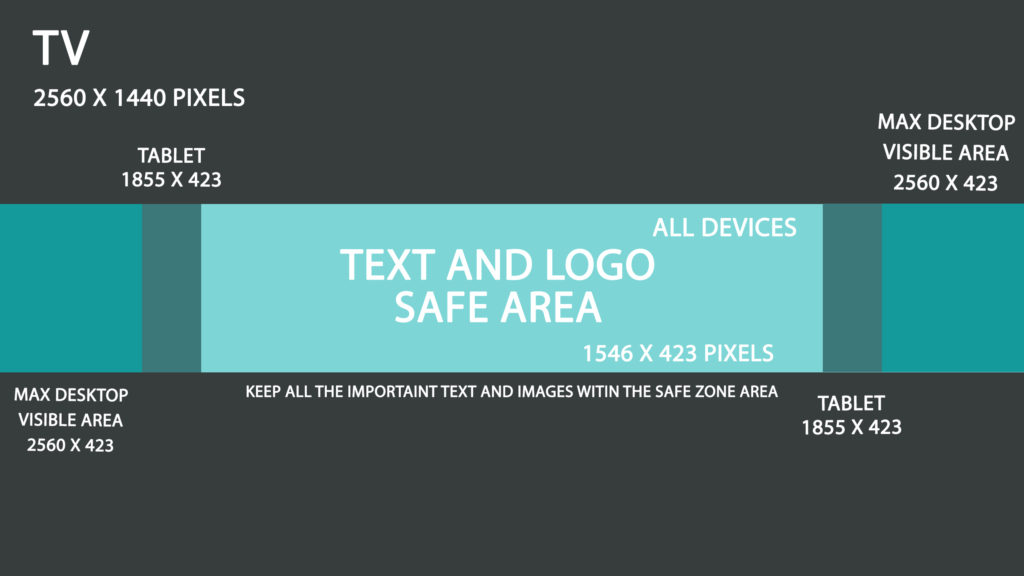
One of the biggest challenges when creating a YouTube banner is creating a design that works for all devices. Some people watch YouTube on their television screen, others view it on their PC, laptop, or tablet. Then 70% of people watch Youtube on their mobile phones. It is important to create a YouTube Banner that looks good across all devices, especially people's phones.
How to Make a YouTube Banner in Adobe Photoshop
Step 1.
Create a new Photoshop document or download our free template.
To create a YouTube banner that looks great across all devices you are going to make sure you have the right dimensions. In Adobe Photoshop you are going to want to create a 2560 x 1440 px document. Or to make it even easier, you can download our template below. Just Click the Image and you will be brought to a page with the full-sized graphic. Then right-click and hit "save image as."
Once you have downloaded our template, bring it into photoshop. You can either: A) click and drag the template into Adobe Photoshop or B) click File, select Open and from there you can select your downloaded template.
Step 2.
Add a background color, texture, or image to your new project file.
To add a fill (solid color) background layer, you can click on the plus (create new layer) icon in the layers tab to create a blank layer. You can then navigate to the toolbar on the left-hand side of photoshop and select the paint bucket icon and select a color. With the color for your background layer selected, you can click anywhere on the blank new layer you created to fill in the layer with that color.
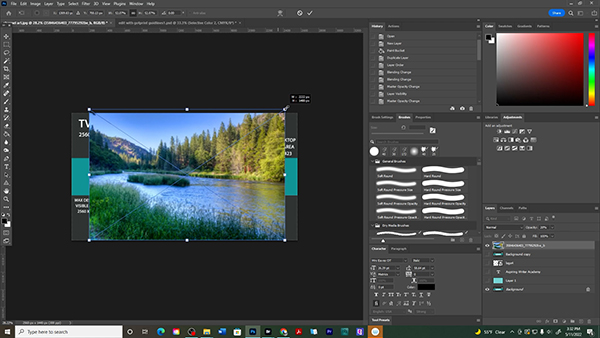
If you choose to use a real image as your YouTube Banner background, navigate to your folder's panel. In the Folder, grab the image file you wish to use in your YouYube Banner and drag and drop it into your YouTube Channel Art Template. After dropping your background image into your project you can grab the draggable outline around your graphic to resize and hit enter. If you want to adjust the size of your graphic some more you can hit Ctrl + T (Free Transform) to open up the free transform tool again so that you can resize, rotate, or skew your image.
Step 3.
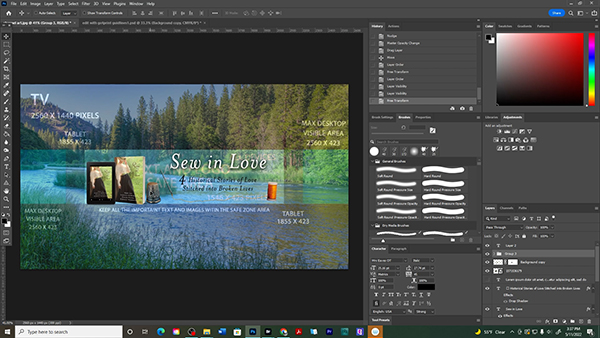
Drop-In Any Pieces You Want Included in Your Youtube Banner.
This might be your author headshot, your logo, book cover, or any other important items that you want in your YouTube Channel Art. Just remember Ctrl + T (Free Transform) so that you can resize, rotate, or skew your imported graphics to fit properly within the banner.
Step 4.
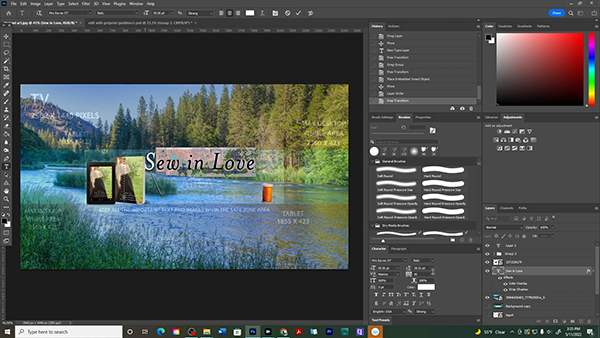
Add Text to Your YouTube Channel Art.
Next, you will want to add some text to your YouTube Banner. To add the text, you will want to click on the T icon for text on the left side of your toolbar. After clicking on the Text tool you will want to click somewhere within your YouTube Channel Art and draw a box. This will be the text box that you can adjust and tweak. To control the size of your font you can change your size, spacing, and other type details with the character box. If you do not see the character box in your photoshop tools click on the top of the screen Window, scroll down till you see the words Character, and click to add the little checkmark toggle. You should now have the character panel open where you can control your type.
Step 5.
Save and Export Your Project.
The final step is to flatten your project layers and save everything. To flatten your YouTube Channel Art, navigate to the right-hand side of photoshop to your Layers Panel. In the layers panel, click on any image nontext layer and right-click, and hit Flatten Image. Once your image is flattened you can click Ctrl + Shift + S (Save As) or go up to the top of your photoshop dashboard and click File Save As.
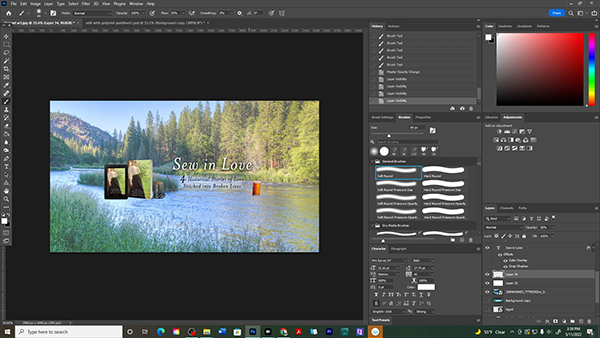
After following all these steps you should have a YouTube Banner that looks great on all devices and is all set to upload. If you want to see everything in more detail, Click to Watch our more in-depth tutorial on YouTube.
If you do not already have Adobe Photoshop installed on your computer, Click Here to download a free trial.
If you have any questions or would like to leave a comment below, we would love to hear from you!
Our Goal for Aspiring Writer Academy is to help people learn how to write quality fiction, teach them to publish and promote their work, and to give them the necessary tools to pursue a writing career.
ENTER YOUR EMAIL
TO GET YOUR FREE
"First Steps Guide for Aspiring Writers" a 30-page comprehensive resource to get you started on your writing journey.
Other Blog Posts You May Like
How to Write Act I: Opening Scenes for Your Fictional Story
Learn to Plot Fiction Writing Series: Story Analysis of “Beauty and the Beast”
How to Plot Your Fictional Novel (with Free Template Included)
The Ultimate Book Signing Checklist: What to Bring to Your First Book Signing
5 Questions to Create Believable Villains
Why Your Characters Need Story-Worthy Goals
3 Levels of Goal Setting for Fiction Writers
Fiction Writing: How to Write a Back Cover Blurb that Sells
Fiction Writing: How to Name Your Cast of Characters
How to Captivate Your Readers with Scene-Ending Hooks
Scene & Sequel: The Secret to Plotting an Epic Novel
Scene & Sequel: The Secret to Plotting an Epic Novel (Part 2)
Writing Fiction: How to Develop Your Story Premise
12 Quick Tips to Write Dazzling Dialogue
10 Questions to Ask When Creating Characters for Your Story
Macro Edits: Looking at Your Story as a Whole
Basic Story Structure: How to Plot in 6 Steps
Do you find it difficult to create compelling antagonists and villains for your stories? Do your villains feel cartoonish and unbelievable? Do they lack motivation or a specific game plan? Discover the secrets to crafting villains that will stick with your readers long after they finish your story, with our How to Create Antagonists & Villains Workbook.
This 32-page instructional workbook is packed with valuable fill-in-the-blank templates and practical advice to help you create memorable and effective antagonists and villains. Whether you're a seasoned writer or just starting out, this workbook will take your writing to the next level.
Samantha Panzera is an adventurous travel blogger, graphic designer, and multi-media business entrepreneur who uses the experience she’s gained over the years to teach aspiring writers the skills they need to build an author platform and take their careers to the next level.
